

Introduction
Learning how to screenshot in laptop or desktop computer is one of the most useful skills you can master in today’s digital world. Whether you’re saving an important document, capturing an error message for tech support, or sharing something interesting with friends, screenshots make it easy. In India, where digital literacy is growing rapidly, knowing how to screenshot in laptop or desktop computer is essential for students, professionals, and everyday users.
This guide will walk you through everything you need to know about taking screenshots on different operating systems, including Windows, Mac, Linux, and Chromebook. We’ll also explore third-party tools, editing tips, and troubleshooting advice to ensure you can capture your screen like a pro.
Why Taking Screenshot in Laptop is Important
Screenshots are more than just images; they’re a way to preserve information, solve problems, and communicate effectively. Here’s why they matter:
- Documentation: Save receipts, transaction details, or important emails for future reference.
- Troubleshooting: Capture error messages to share with tech support.
- Education: Students can save online lectures, notes, or diagrams for study purposes.
- Work: Professionals can use screenshots for presentations, reports, or collaboration.
In India, where digital transactions and online learning are on the rise, screenshots have become a vital tool for millions of users.
How to Screenshot on Windows
If you’re wondering how to screenshot in laptop running Windows, you’re in luck. Windows offers multiple built-in methods to capture your screen effortlessly.
Using the Print Screen (PrtScn) Button

The Print Screen button is the simplest way to capture your entire screen. Here’s how it works:
- This takes a screenshot of the full screen and saves it to the clipboard.
- Open an image editor like Paint or Microsoft Word.
- Press Ctrl + V to paste the screenshot.
- Save the file in your preferred format (e.g., JPEG or PNG).
Pro Tip: Use Alt + PrtScn to capture only the active window.
Using Windows Key + PrtScn
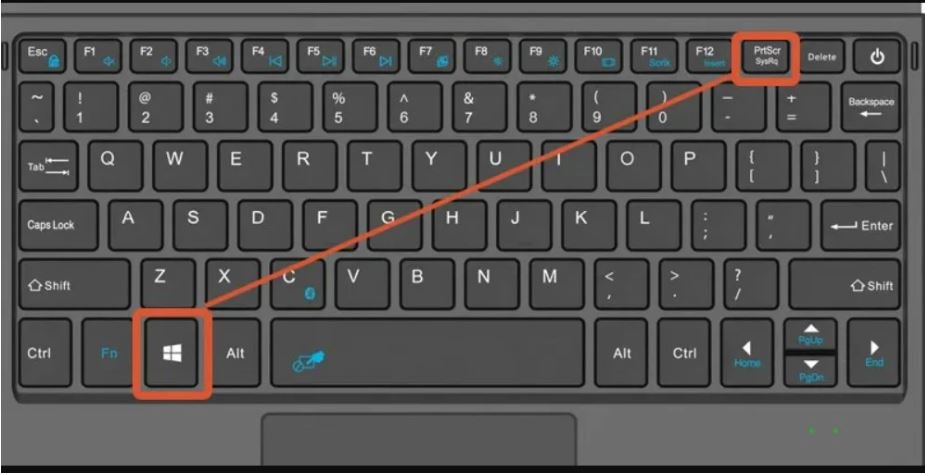
If you want to save the screenshot directly without using an editor:
- Press Windows Key + PrtScn.
- The screen will dim briefly, indicating the screenshot has been taken.
- Find the screenshot in the Pictures > Screenshots folder.
Using the Snipping Tool
The Snipping Tool is a built-in app that allows you to capture custom screenshots. Here’s how to use it:
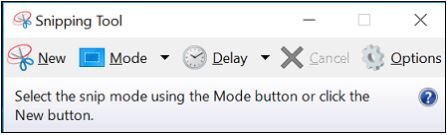
- Open the Snipping Tool from the Start menu.
- Click New and select the area you want to capture.
- Use the editing tools to highlight or annotate the screenshot.
- Save the image to your desired location.
Using Snip & Sketch (Windows 10/11)
Snip & Sketch is an upgraded version of the Snipping Tool with more features:
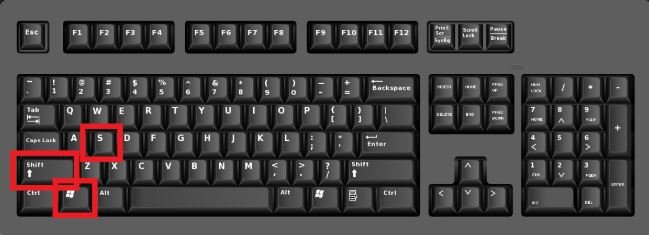
- Press the Windows Key + Shift + S to launch the snipping toolbar.
- Choose the snip type (rectangular, freeform, window, or full-screen).
- The screenshot will be copied to the clipboard and opened in Snip & Sketch for editing.
Using Game Bar (for Gamers)
For gamers, the Xbox Game Bar is a useful feature:

- Press Windows Key + G to open the Game Bar.
- Tap the camera icon or press Windows Key + Alt + PrtScn to capture a screenshot.
- The screenshot will be stored in the Videos > Captures directory.
Also Read: How to Screenshot on Windows
How to Take a Screenshot on Mac
For Mac users, learning how to screenshot in laptop is simple thanks to intuitive shortcuts and tools.
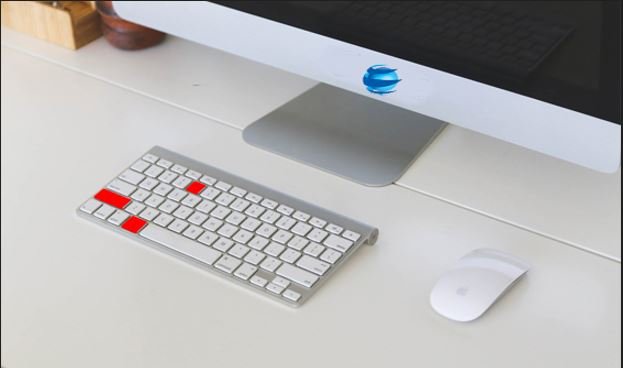
Using Command + Shift + 3
This shortcut captures the entire screen:
- Press Command + Shift + 3.
- The screenshot will be saved as a file directly on your desktop.
Using Command + Shift + 4
For more control, use this shortcut to select a specific area:
- Press Command + Shift + 4.
- Move the crosshair to select the portion of the screen you wish to capture.
- Release the mouse button to take the screenshot.
Pro Tip: Press the Spacebar after starting the shortcut to capture a specific window.
Using Command + Shift + 5
This shortcut opens the screenshot toolbar, which offers advanced options:
- Press Command + Shift + 5.
- Select whether to capture the whole screen, a specific window, or a custom area.
- You can also record your screen using this tool.
Using Preview App
The Preview app offers additional screenshot options:
- Open the Preview app from the Applications folder.
- Go to File > Take Screenshot.
- Pick from capturing the full screen, a specific window, or a chosen area.
How to Take a Screenshot on Linux
If you’re a Linux user, you might be curious about how to screenshot in laptop using this open-source OS. Fortunately, Linux offers several methods to capture your screen.
Using the Print Screen Button
Most Linux distributions support the PrtScn button:
- Press PrtScn to capture the entire screen.
- Use Alt + PrtScn to capture the active window.
- The screenshot will be saved in the Pictures folder.
Using GNOME Screenshot Tool
GNOME users can use the built-in screenshot tool:
- Open the Activities menu and search for “Screenshot.”
- Choose between capturing the entire screen, a window, or a selected area.
- Save the screenshot to your desired location.
Using Command Line Tools
Advanced users can use tools like Scrot or ImageMagick:
- Install Scrot using the “terminal:bashCopysudo” apt-get install scrot
- Capture a screenshot “with:bashCopyscrot” screenshot.png
How to Take a Screenshot on Chromebook
Chromebooks are gaining popularity in India, especially among students who want to learn how to screenshot in laptop for educational purposes:
Using Ctrl + Show Windows Button
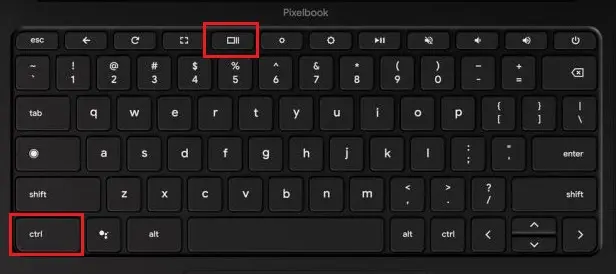
- Press Ctrl + Show Windows (the rectangle key).
- The screenshot will be saved in the Downloads folder.
Using Ctrl + Shift + Show Windows Button
- Press Ctrl + Shift + Show Windows.
- Click and hold to select the portion of the screen you want to capture.
- The screenshot will be saved in the Downloads folder.
Third-Party Screenshot Tools for Laptops and Desktops
If you need more features than built-in tools offer, consider these third-party options:
Lightshot
- Lightweight and easy to use.
- Allows quick editing and sharing.
Snagit
- Advanced editing and recording features.
- Ideal for professionals.
Greenshot
- Open-source and customizable.
- Great for creating annotated screenshots.
How to Edit and Annotate Screenshots
Editing tools can help you highlight important information:
- Built-in Tools: Use Snip & Sketch or Preview for basic edits.
- Third-Party Tools: Try Canva or GIMP for advanced editing.
Troubleshooting Common Screenshot Issues
Screenshot Not Saving
- Check your storage space.
- Ensure the screenshot folder exists.
Black Screenshots
- Update your graphics drivers.
- Disable hardware acceleration in apps.
Keyboard Shortcuts Not Working
- Restart your computer.
- Check for conflicting software.
Tips for Taking Better Screenshots
- Use high-contrast areas for clarity.
- Crop and annotate to highlight important information.
- Organize screenshots in folders for easy access.
Also Read: What is the proper way to maintain a laptop? A Step-by-Step Guide
Frequently Asked Questions (FAQs)
Where are my screenshots saved?
- Windows: Pictures > Screenshots
- Mac: Desktop
- Linux: Pictures folder
- Chromebook: Downloads folder
Can I take a screenshot without a keyboard?
- Yes, use on-screen tools like the Snipping Tool or Snip & Sketch.
What is the process for capturing a screenshot of a particular window?
- Windows: Alt + PrtScn
- Mac: Command + Shift + 4, then press Spacebar
Can I take a scrolling screenshot?
- Use third-party tools like Snagit or PicPick.
What’s the method for capturing a screenshot on a dual-monitor setup?
- Use the Print Screen button or a tool that supports multi-monitor capture.
Conclusion
Knowing how to screenshot in laptop or desktop computer is a valuable skill for Indian users in today’s digital age. Whether you’re using Windows, Mac, Linux, or Chromebook, this guide has covered all the methods and tools you need. Practice these techniques, explore third-party tools, and start capturing your screen like a pro!
Share this guide with your friends and family to help them master screenshots too!